JR Body (2G Cloud)
CMTC Installation
CMTC Calibration
JA/JX Body (1G Cloud)
CMTC Installation
CMTC Calibration
Swaybar Installation
Cat-Back Exhaust
Induction Tube
MSD 6AL Installation
TPS Modification
Miscellaneous
Waste Money
Car Information
AllData
AllPar
The Society of Automotive Engineers
Car Enthusiasts
2GSS.net
Dakota-Durango
Stratusphere
2GN.Org
Neons.Org
LXForums
Custom Magnums
SebringClub.net
Car Parts Vendors
Car-Part.Com
Mopar Dealer Parts
|
|
How To Modify the Throttle Position Sensor to Gain Response
JA/JX (1G Cloud)
This How-To describes how to modify the throttle position sensor (TPS) on the engine of a Chrysler Sebring Convertible/Chrysler Cirrus/Dodge Stratus/Plymouth Breeze vehicle. The TPS is physically modified to allow adjustment of the voltage coming out of the TPS to the TCM. The TPS output voltage is then adjusted to change when and how the TCM shifts gears on the automatic transmission, resulting in crisper shifting and better off-the-line starting. While this How-To was written specifically for the V-6, the instructions presented here can be applied to the Chrysler-built 2.4L/2.0L I-4 engines, as well. This modification is estimated to add up to 4 peak HP and 3 peak ft-lbf torque.
| Warning |
|---|
| The instruction presented herein is to be used at your own risk. While checked for accuracy, the information in this page may not be 100% accurate, and may not work for your particular vehicle. I will not assume liability for any damages or injuries that result from either properly or improperly following this instruction. Failure to abide by this instruction while performing the indicated task may result in costly damage and/or injury. |
| Note |
|---|
This instruction only applies to the below models:
| Automobile | Model Year | 2.0L
I-4 | 2.4L
I-4 | 2.5L
V-6 |
| Sebring Convertible | 1996-2000 | N/A | No | Yes |
| Cirrus | 1995-2000 | No | No | Yes |
| Stratus | 1995-2000 | No | No | Yes |
| Breeze | 1996-2000 | No | No | N/A |
|
| Note |
|---|
| Due to the PCM's adaptive programming, the PCM may adjust to compensate for the voltage adjustment described in this instruction. Because of this, a vehicle with this modification may occasionally act erratically over the course of a few days after performing this modification. Symptoms may include hesitation when coming out of a stop. This is normal, and is due to the PCM attempting to re-learn the TPS output. Do not panic. Disconnecting the battery negative cable is recommended, which will cause the PCM to re-learn the TPS voltage from scratch, and eliminates any chance of erratic behavoir from your vehicle. |
| Note |
|---|
| This instruction assumes that the reader is mechanically competent. If in doubt, seek help. |
- Tools List
- DC Voltmeter (Any suitable digital or analog multimeter will do, as long as a reliable reading between +0 and +10 volts DC can be obtained)
- Drill
- 1/4" Drill Bit
- #20 Torx Key
- Bench-Mounted Vise
- Needle-Nose Pliers
- 3/8" Metric Wrench Set
Procedure
 |
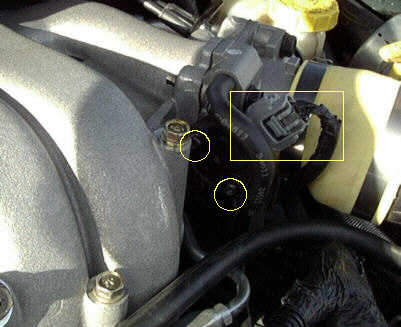
TPS View on a V-6 Engine
Torx bolts are circled, while the TPS three-wire connector is boxed.
|
- Turn the ignition to on, but do not start the vehicle.
| Note |
|---|
| All voltage readings in this instruction are taken between the center wire of the three-wire TPS connector and the engine block ground. A narrow metal object, such as a straightened paper clip, should be inserted into the center wire cavity to allow for ease of voltage reading. Take care not to short out any of the TPS connector wires to ground. |
- Using the DC voltmeter, take a voltage reading from the center wire of the TPS three-wire connector to ground with the throttle plate fully shut, then fully opened.
- Turn off the ignition.
| Caution |
|---|
| Failure to follow the next step may cause the instrument cluster "Check Engine Soon" light to come on. If this has happened, the vehicle has gone into "limp-in" mode. Vehicle performance and gas mileage will suffer. |
- Disconnect the battery negative cable from the left front strut tower.
- Remove the TPS three-wire connector from the TPS.
- Remove two Torx bolts holding the TPS to the throttle body, then carefully remove the TPS.
- Carefully place the TPS in the vise, such that the vise is holding the connector side of the TPS.
| Warning |
|---|
| Take special care when drilling out the TPS metal sleeves. A slip-up with the drill may cause severe bodily injury, or damage to the TPS. A new TPS will cost around $50. |
- Using the needle-nose pliers to hold the metal sleeves in place, drill out the metal sleeves using the 1/4" drill bit.
- Remove the TPS from the vise, then clean the TPS of any shavings.
- Carefully re-install the TPS onto the throttle body.
- Install two Torx bolts, but do not tighten them. The TPS must be allowed to freely move.
- Re-attach the TPS three-wire connector to the TPS.
- Re-connect the battery negative cable to the left front strut tower.
- Turn the ignition to on, but do not start the vehicle.
- Keep the throttle closed. While using the DC voltmeter, raise the closed-plate voltage output from the center wire of the TPS connector by carefully rotating the TPS. Do not exceed 1.0 volts DC.
- When the closed-plate voltage is satisfactory, tighten the two Torx bolts.
- Turn off the ignition.
- Disconnect the battery negative cable, and allow 5 minutes for the PCM to bleed off its capacitor memory backup supply.
- Reconnect the battery negative cable.
- Take your vehicle out for a test-drive.
|
