JR Body (2G Cloud)
CMTC Installation
CMTC Calibration
JA/JX Body (1G Cloud)
CMTC Installation
CMTC Calibration
Swaybar Installation
Cat-Back Exhaust
Induction Tube
MSD 6AL Installation
TPS Modification
Miscellaneous
Waste Money
Car Information
AllData
AllPar
The Society of Automotive Engineers
Car Enthusiasts
2GSS.net
Dakota-Durango
Stratusphere
2GN.Org
Neons.Org
LXForums
Custom Magnums
SebringClub.net
Car Parts Vendors
Car-Part.Com
Mopar Dealer Parts
|
|
How To Install a CMTC
JR (2G Cloud)
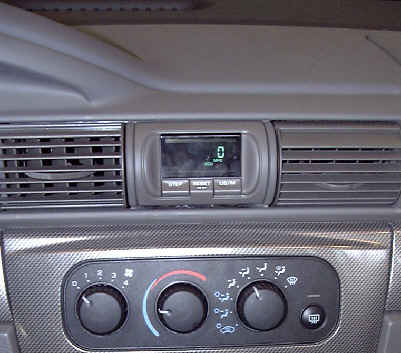
This How-To facilitates the installation of a Compass/Mini-Trip Computer (CMTC) into a Chrysler Sebring Convertible/Chrysler Sebring Sedan/Dodge Stratus Sedan. The CMTC is normally a factory option, and allows the driver to display temperature and direction (8-point), average fuel economy, instantaneous fuel economy, current range to empty fuel tank, trip odometer, and elapsed time since last CMTC reset. In addition, the CMTC display can be cycled off.
Of note is the fact that a separate instrument cluster bezel does not have to be purchased. Since this is considered a permanent modification, the existing instrument cluster bezel is cut in a few places to allow the CMTC to fit.
Also of note is the fact that there is no need to fabricate a wire harness. This is in contrast to the pre-2001 JA/JX Chrysler vehicles, that more often than not had to have a wire harness made to make the CMTC work.
| Warning |
|---|
| The instruction presented herein is to be used at your own risk. While checked for accuracy, the information in this page may not be 100% accurate, and may not work for your particular vehicle. I will not assume liability for any damages or injuries that result from either properly or improperly following this instruction. Failure to abide by this instruction while performing the indicated task may result in costly damage and/or injury. |
| Note |
|---|
This instruction only applies to the below models:
| Automobile | Model Year | 2.4L
I-4 | 2.7L
V-6 |
| Sebring Sedan/Convertible | 2001-up | Yes | Yes |
| Stratus Sedan | 2001-up | Yes | Yes |
|
- Parts List
| Name | Mfr/(Location) | P/N | Cost ($US) |
| CMTC Module | DodgeParts.com | | |
| Taupe | | TQ58WL8AD | 138.75 |
| Sandstone | | TQ58XTMAD | 138.75 |
| Dark Slate | | TQ58XDVAD | 141.75 |
| Royal Blue | | TQ58YBPAD | 141.75 |
- Tools List
- Screwdriver, Phillips Head
- Dremel tool with plastic cutter
- Razorblade or sharp knife
- Rachet, 3/8" Drive
- Socket, 15 mm, 3/8" Drive
- Permanent-ink marker
Procedure
This procedure is divided into two parts.
Installing the CMTC into the vehicle
- Disconnect and isolate the battery negative cable.
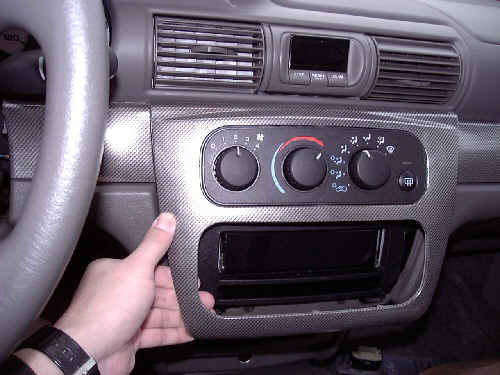 |
| Instrument Panel Center Bezel Being Removed
|
- Gently pry out the edge of the instrument panel center bezel with your fingers, starting from the bottom, then pull outward to remove.
- Disconnect the two HVAC wire connectors on the back of the instrument panel center bezel.
- Remove the fuse cover.
- Gently pry off the trim bezel to the left of the steering wheel, and disconnect the power mirror connector.
- Remove one screw from the trim bezel to the right of the steering wheel, then gently pry off the bezel.
- Remove five screws from the knee bolster panel, then remove the knee bolster panel.
- Remove five screws from the instrument cluster bezel, then gently pry off the bezel.
| Note |
|---|
| The inch marks on the left and bottom of the template are only meant to indicate scale. Also, make sure the top arrow does point toward the top of the instrument cluster bezel. |
 |
| Instrument Cluster Bezel Template for CMTC Holes
|
- Print the above template, then cut out the dark spots.
- Center the template on the back end of the cubby bin, then mark the template holes on the cubby bin using a marker.
- Cut the marks on the cubby bin using a Dremel tool.
- Once the two holes are cut, clean the instrument cluster bezel of shavings, and remove the rubber mat in the cubby bin.
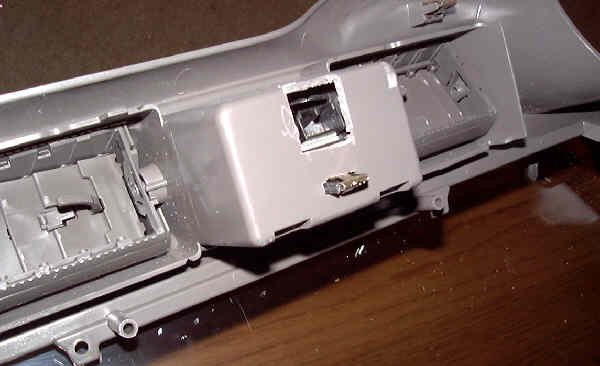 |
| Rear View of Instrument Cluster Bezel with CMTC Installed
|
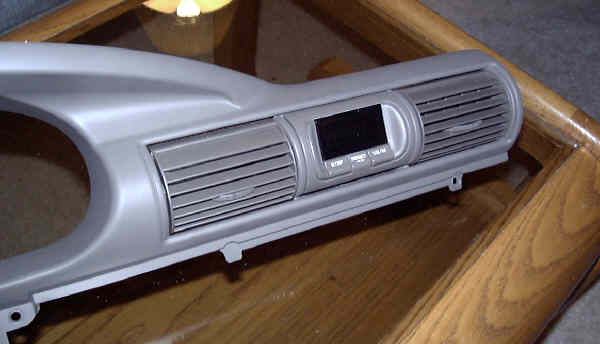 |
| Front View of Instrument Cluster Bezel with CMTC Installed
|
- Install the CMTC into the cubby bin. It should fit snugly in the cubby bin without bumping into the back of the cubby bin. The tang on the CMTC should firmly engage the lower hole without any slop.
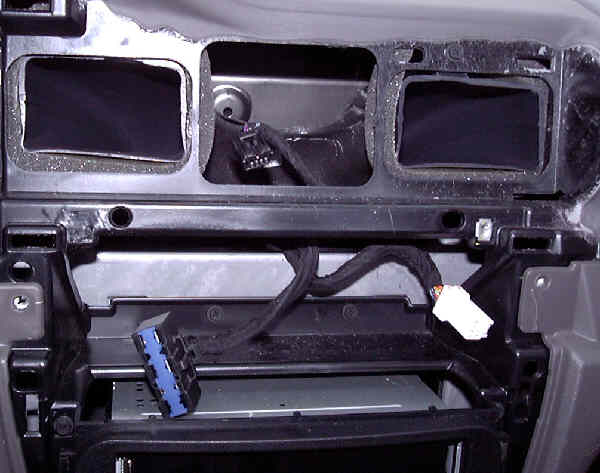 |
| CMTC Wire Harness visible in Hole Between Either Vent
|
- Carefully cut the tape holding the CMTC wire harness and plug from the HVAC wire harness. You should get a result similar to the picture above, with the CMTC harness poking out of the hole between the two vents.
- Connect the CMTC wire harness to the CMTC, then gently push the instrument cluster bezel into the dashboard, and install five screws.
- Install the knee bolster panel, then install five screws. It may be necessary to hold the knee bolster by hand while engaging the screws.
- Connect the power mirror connector to the power mirror switch, then gently install the trim bezel to the left of the steering wheel.
- Gently install the trim bezel to the right of the steering wheel, and install one screw.
- Connect the two HVAC wire connectors to the center trim bezel, then gently install the center trim bezel.
- Reconnect the battery negative cable.
CMTC Calibration and Setting Magnetic Variance
- Turn the ignition to the "On" position.
- Using the CMTC "Step" button, cycle the CMTC display as necessary to display the compass and temperature display.
- Simultaneously press the CMTC "US/M" and "Step" buttons. After a brief wait, the magnetic variance display should appear.
- Using the below map, press the CMTC "Step" button to set the correct magnetic variance for your region. The CMTC will return to the compass and temperature display after 5 seconds of no button activity.
 |
| CMTC Magnetic Variance Diagram
|
- Drive the vehicle to a wide open area free of any large metal object, then slowly (around 5 MPH) drive in a circle about three times, or until the "C" goes away from the compass display.
You're Done!!!
 |
| JR CMTC Computer Installation
|
|


