|
Never Forget |
||||||||||||||||||||||||||||||||||||||||||||||||||||||||||||||||||||||||||||||||||
|
|
||||||||||||||||||||||||||||||||||||||||||||||||||||||||||||||||||||||||||||||||||
JR Body (2G Cloud)JA/JX Body (1G Cloud)MiscellaneousCar InformationThe Society of Automotive Engineers Car EnthusiastsCar Parts Vendors |
How To Build The Mark I Air Induction TubeJA/JX (1G Cloud)
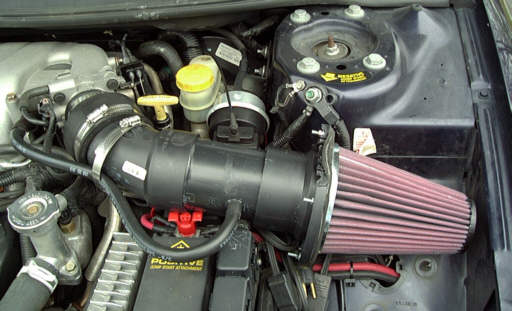
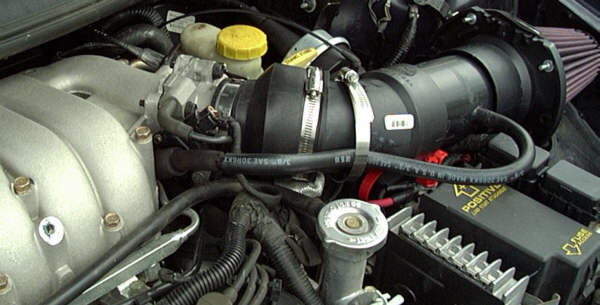
I went ahead and chucked the stock air intake with its "resonator" tube, and replaced it with a home-built cold-air induction intake. As you can see, the intake itself is basically a 3 inch ID ABS plastic tube with a K&N cone filter bolted to the end. Why bolted? I can't seem to find a speed shop that will sell me the filter that can be clamped on! Oh well...
The tube itself cost about $70.00 for parts, and most of that was the filter itself. I had to buy a 10 foot ABS pipe since I could not find a decent-sized (around 1 foot) pipe around. I decided to stick the emissions fitting into the side of the pipe just after the cone. This was a lot better than finding an air breather and sticking it onto the end of the emissions hose. I don't have access to a dynamometer, but I did see a very noticable improvement overall in performance, and I did notice that the car will get anywhere from 3 to 7 more MPG than it did before. So there is a measurable improvement. I figure I may have given myself about 7 extra HP from this mod alone. If you choose to build one yourself, be forewarned that first of all, you are going to make and install this pipe at your own risk. I am certainly not holding a gun to your head, forcing you to assemble this pipe, am I? :) Once you accept this, read on.
AssemblyYou'll need 7.5 inches of the 3 in ID pipe. After you obtain this, be sure to clean off the edges with a fine-toothed file. If you have a Dremel tool, so much the better. Next, take several grades of sandpaper and smooth out the rough edges in the 45 degree elbow. Start by using the coarsest grade you have, then use ever increasing sandpaper grades to smooth out the interior diameter. When you are done, the inside surface should feel smooth and squeaky when wet. Next, wash out the pipe and the elbow thoroughly; after all, you don't want to have anything sucked into your engine. Follow the directions on the can of the ABS cement, and glue the elbow to the pipe, and allow to dry. Now, drill a hole in the pipe (or the elbow, it's really your call here) big enough for the 3/8 inch fitting to snug itself into. Just make sure that the fitting sticks out the side of the tube as the tube is laying flat on the floor. Take the ABS cement and glue the fitting into the hole, and let dry. Once the cememt sets, wash out the tube again. Now, if you were lucky enough to find a cone filter that clamps onto the piping, skip to the last paragraph. Otherwise, read on. Take the water closet adaptor and file off the inside lip until the adaptor is able to slide over the pipe. Once you have done this, clean off the adaptor, and cement the adaptor to the straight end of the induction tube you worked on earlier, making sure that the edge of the pipe is level with the surface of the adaptor. Set aside to dry. Take the filter you bought (it should have a flange that sticks out about 1/2 inch or so), and drill 4 holes on the flange, spaced roughly equal distances from each other. Be very careful; you don't want metal filings to go into the cone. Now, take the cone and center it on the water closet fitting. While holding the tube in place, CAREFULLY drill a hole in the water closet fitting, using a hole you just drilled into the cone as a guide. Once you have done this, fasten the cone to the fitting with a bolt and two washers, and hand-tighten. Once the cone is securely fastened to the fitting, drill out the other three holes in the fitting, using the other three holes in the cone filter flange, making sure that the cone does not become un-centered. Once you are done, remove any plastic shavings from the outside of the assembly, and take the cone off.
Now, take the cork sheet, and make a gasket that will be sandwiched between the cone and the pipe fitting. The gasket should be wide enough to provide a good seal, yet have a large enough hole in the center for the filter to work. Once you are done, wash the tube again, and clean the cone and gasket as best you can. Hold the pipe upright, and place the gasket onto the fitting. Take the cone, align the holes you just drilled, and place the cone onto the fitting. Now, fasten the cone to the fitting using the bolts, washers, and nuts. The direction of the bolt does not matter, as long as both the bolt head and the nut end have a flat washer, and that the lockwasher goes between the flat washer and the nut. You may have to file off some of the water closet fitting so that you don't end up denting your hood when this tube is installed. Take note of this while you're fitting the tube onto the throttle body, later on. Now, take the 3 in to 2 in rubber adaptor and carefully fit the adaptor onto the 45 degree end of your pipe. You may have to loosen the clamp to get the adaptor on. Once the adaptor is securely on, clamp the adaptor to the pipe so that it does not move. Next, take the fuel line and carefully press it onto the 3/8 in fitting on the side of the pipe. Insert the other 3/8 in fitting onto the loose end of the fuel line.
InstallationFirst, disconnect the negative battery cable. Next, take the stock filter assembly off the vehicle. You'll need to remove the bolt that holds the resonator tube to the intake air plenum. Take the cover off the air filter element housing, remove the clamp holding the air hose to the throttle body, and carefully remove the emissions hose from the resonator tube. Set the hose aside. Take the air filter element housing and firmly yank up and forward until the housing comes out. Next, carefully press the rubber end of your homebuilt tube into place on the throttle body, and adjust the fit of the tube so that it fits in the engine compartment. Once you are done, clamp the throttle body end down. Now, take the small fuel hose with the 3/8 in adaptor, and attach it to the emissions hose. Gently close the hood and take note of any problems with the hose. You may need to adjust the fit of the hose further. Once this is done, reconnect the negative battery cable. Now, once your car is back together, take it for a test drive, and enjoy your new air tube! Assembly NotesYou may want to use a Dremel tool to chamfer the edges of the straight 3 in pipe where it meets the 45 degree elbow. This will ensure a tighter fit and present less of a rough surface to the airflow going through the tube. Also, you may want to get an extra clamp to gently clamp down the fuel hose to the pipe (do not crush the hose). |
|||||||||||||||||||||||||||||||||||||||||||||||||||||||||||||||||||||||||||||||||
|
Chrysler, the Chrysler logo, Dodge, and Mopar are registered trademarks of Fiat Chrysler Automobiles. Other trademarks and logos are copyrighted by their various owners. This website copyright © 2000-2015 Thomas A. Vago. All Rights Reserved. |
This page last updated 20 April 2010. | |||||||||||||||||||||||||||||||||||||||||||||||||||||||||||||||||||||||||||||||||

